Colour and decorating
Colour Drenching for Sri Lankan Homes: Full Room or a Gentler Version?
Colour drenching can give a room a coordinated, enveloping character by carrying one colour family across walls, ceiling and painted details. Start with your daylight, existing furniture and preferred evening atmosphere. Test the actual paint before committing to every surface. If a coloured ceiling feels too strong, a tonal scheme with a lighter ceiling can keep the room coordinated without a full drench. Neither approach needs every piece of timber furniture painted. This guide helps you choose the extent of the treatment and turn the idea into a practical decorating brief.
Choose the extent before choosing the shade
| Approach | What changes | Main decision to test |
|---|---|---|
| Full drench | Walls, ceiling and selected painted details share a colour family | How the ceiling and evening light feel |
| Modified tonal scheme | Coordinated walls and details; ceiling stays lighter | Whether the contrast is gentle enough |
| Colour on walls only | Existing ceiling and trim remain distinct | How retained finishes work with the new walls |
| One bounded room | Apply the chosen approach in a defined space | Where the colour stops at adjoining rooms |
What the current interest tells us—and what it does not
Dulux’s living-room guidance describes colour drenching across walls, ceilings and trim. A further Dulux technique article dated 8 September 2026 discusses a related approach using more than one tone. These primary manufacturer features show current editorial interest in immersive colour schemes. They do not establish search volume, Sri Lankan popularity, local product availability or a guarantee that the technique suits your home.
Use the trend as a question to investigate: would reducing the contrast between surfaces improve this particular room? A narrow collection of colours can make furniture and artwork stand out, but the result is subjective. A bright reference photograph may have different exposure, windows and artificial lighting from yours. Do not choose the entire room from the mood of an image alone.
Decide how much of the room will share the colour
Write a surface list before choosing a shade: walls, ceiling, cornice, skirting, internal doors and any already-painted joinery. Mark each item as included, retained or undecided. For a full drench, the ceiling belongs in the plan. If you keep it lighter, call the result a modified tonal scheme so the painter and household understand the intended difference.
You do not have to coat a valuable teak door or natural mahogany furniture to complete the idea. Keep sound timber finishes where they contribute warmth and fit the brief. Also decide what happens at the doorway to the next room. A clear stopping point is easier to price and maintain than an undefined instruction to paint everything. Protect fittings and keep switches, ventilation openings, hinges and working mechanisms functional; they are not decorative surfaces to cover indiscriminately.
Test the shade through your normal day
Prepare substantial moveable sample boards using the proposed product and application method. View them near the floor, curtain, sofa and timber, then move them between the brighter and shaded sides of the room. Check morning, afternoon and the lamps you actually use after dark. Keep the surrounding lighting normal; a colour chosen under a temporary bright work light may disappoint later.
For the ceiling decision, hold the sample in an overhead position safely from floor level or ask the decorator to make a suitable trial area. Light reaches horizontal and vertical surfaces differently, so matching the colour name will not make every surface appear identical. Screens and generated images add another layer of variation. Record the chosen brand, exact verified tint reference, product and finish after testing, rather than asking the shop to match a screenshot by eye.
Let existing materials help you choose
Begin with the items you intend to keep. A warm timber floor, reddish furniture, grey tile or patterned sofa already influences the room. Put the samples directly beside those finishes. Ask whether the proposed colour makes an existing item look more intentional or suddenly creates a mismatch you would need to spend money correcting.
For a first attempt, a restrained blue-green, clay, muted olive or warm neutral family can be explored without promising any universal colour effect. The right choice is the one the household prefers in its actual light. Keep a small supporting palette for curtains, cushions and rugs, and allow some plain surfaces between patterns. Natural solid timber can remain the connecting material across rooms even when their paint colours differ. Avoid ordering new upholstery until the paint samples and retained materials have been reviewed together.
Choose a coating for each surface
One colour family does not mean one tin of wall paint is suitable for plaster, timber and metal. List the substrate and the required preparation for each included surface. The product supplier and decorator should confirm the compatible system, drying and recoating instructions and the finish suited to cleaning and everyday wear.
A similar tint can look different in matt and a more reflective finish. Review the chosen combinations on samples rather than assuming a perfect visual match. In humid conditions, follow the product’s stated application conditions and investigate damp, peeling or mould before decorating. Painting over a defect to complete the colour scheme hides the problem temporarily. This article focuses on colour extent; the linked paint-sheen guide explains washable finishes in more detail. Do not change electrical fittings or obscure safety labels to force everything into the palette.
Two room examples: an enveloping lounge and a softer bedroom
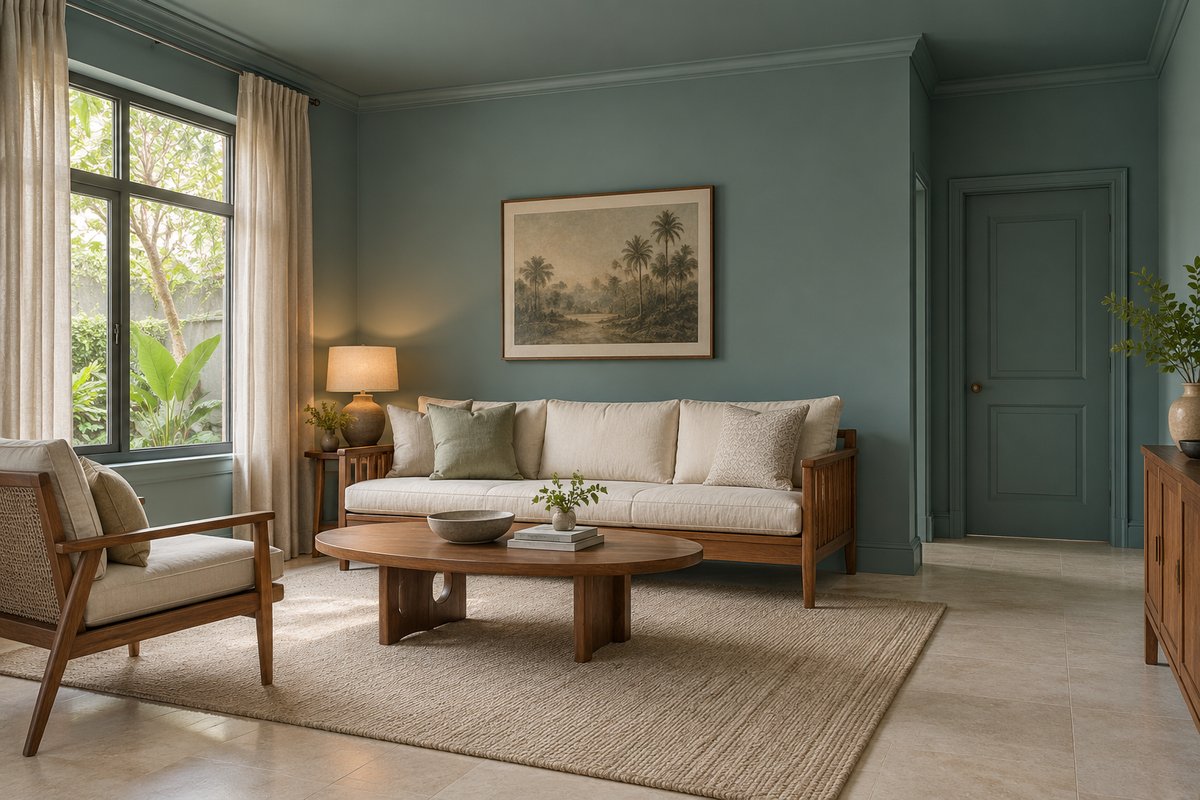
In the living-room concept, blue-green continues over the ceiling and painted trim. Ivory upholstery and natural teak give the room a separate layer, so the furniture does not disappear into the paint. Before adopting that approach, test the ceiling colour and the evening lamp arrangement, and confirm where the colour stops at the adjoining space.
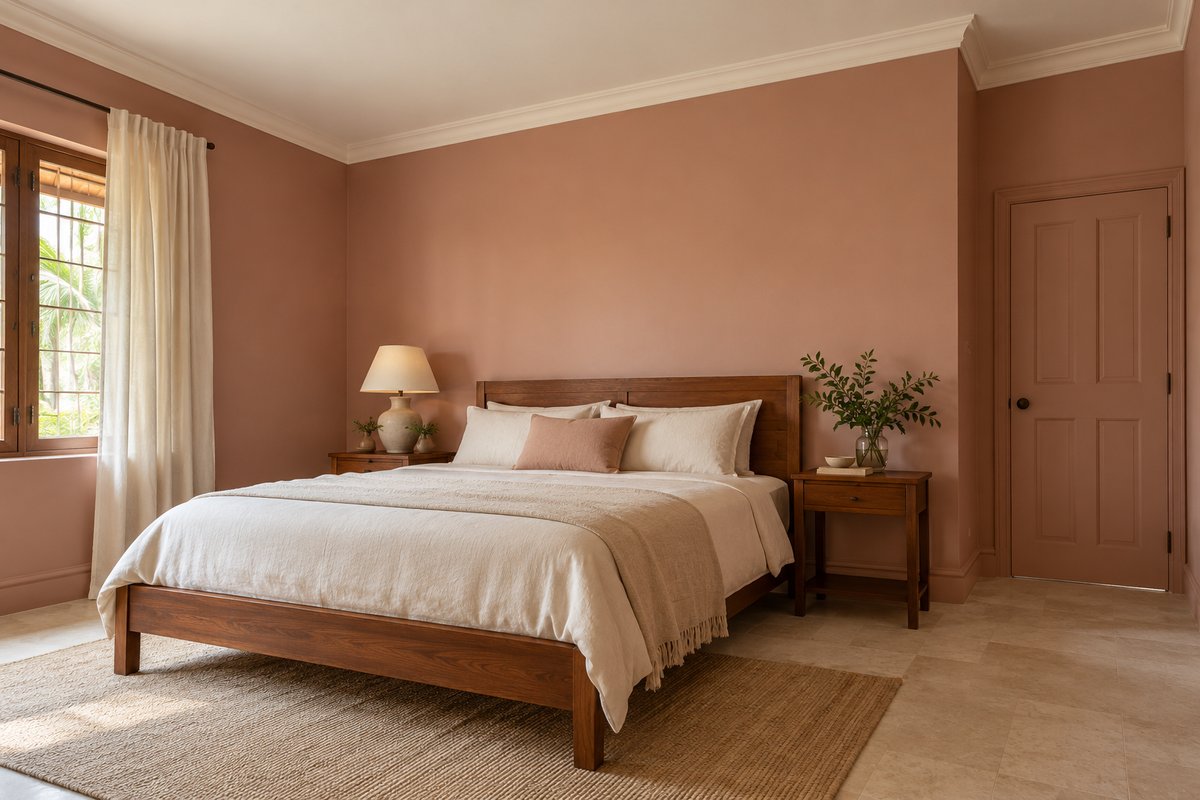
The bedroom example takes a gentler route: clay-toned walls and a matching painted door with a lighter ceiling. The natural bed remains unpainted. It is a modified tonal scheme rather than a full drench, and may suit someone who likes coordinated colour but wants a visible ceiling contrast. Neither image supplies a paint code, measured layout or completed-project claim. Both are hypothetical design concepts; choose the actual finish and furniture arrangement for your room.
Price the complete change and plan the work
Ask for an itemised quotation based on the surface schedule, not only the room’s floor area. Include protection, preparation, repairs, access to high areas, primers where required, separate coating products, application and cleanup. Identify whether doors, frames, ceilings, moving furniture and removing fittings are included. A deeper change of colour, difficult existing finish or detailed trim can alter the work; agree the specification before comparing totals.
Use manufacturer coverage guidance and the measured surfaces for quantities. Do not assume a universal number of coats or an online room price. Allow for samples and the household’s need to keep using the home. Follow paint-label ventilation and safety precautions; EPA guidance recommends fresh air when using products that emit volatile compounds. Do not promise an exact safe return-to-room time without the selected product guidance and project conditions. Qualified trades should handle necessary electrical work.
Review the finished room and keep a maintenance record
Inspect the work in daylight and under the normal evening lights. Compare surfaces with the agreed samples rather than an edited inspiration image. Check edges, coverage, working doors and protected fittings with the decorator. Keep the exact product, tint, finish and batch information where available, plus the approved cleaning instructions, for future repairs.
Common mistakes are choosing from a phone screen, overlooking the ceiling, repainting good timber unnecessarily and buying all the fabrics before testing paint. Another is expecting a dark colour to fix weak lighting or a lighter colour to solve overheating. Colour is a visual decision; shading, ventilation and lighting still need their own planning. If the full treatment feels uncertain, trial a clearly bounded room or use the lighter-ceiling option before extending the idea elsewhere.
Your next-step checklist
- List included surfaces and retained timber finishes.
- Test actual products beside furniture, floor and curtains.
- Review daylight, evening lamps and the ceiling sample.
- Specify coating systems by surface and cleaning need.
- Agree preparation, access, protection and quotation exclusions.
- Keep tint, finish and care records after handover.
Common questions
Does colour drenching have to be dark?
No. It describes the extent and relationship of colour across surfaces. A light or muted family can be explored too; test the actual room before committing.
Must I paint natural timber furniture?
No. Keep suitable existing finishes and coordinate the painted room around them. Any change to valuable timber should be a deliberate separate decision.
Will it make a small room bigger?
There is no guarantee. Reducing contrast can change the visual impression, but daylight, furnishings, shade and personal preference matter. The usable room dimensions do not change.
Can the same paint go on every surface?
Do not assume so. Confirm a compatible product and preparation system for each material, even when the tint is intended to match.
How can BJ Atelier help me decide?
Send room photos, dimensions, retained furniture and your colour preferences. BJ Atelier is based in Chilaw, Sri Lanka, with online consultations available and no showroom. Colour direction, visual concepts and any measured design or cost planning are agreed to a defined scope.
Related planning guides
Further reading & sources
Make the idea work for your home.
Share your location, room photos, dimensions and budget range. We can help you choose the appropriate design, drawing or costing service.
Explore design services →Prepared with AI assistance for BJ Atelier. These articles offer general planning guidance. Project-specific dimensions, specifications, professional checks and prices are agreed separately.